
How to Install Google Analytics on Your Website

When it comes to website metrics and data analysis, it’s hard to beat Google. So it should come as no surprise that Google Analytics is the most recommended tool for tracking your website’s data. However, it can be tough to know where to start with this sophisticated platform.
Fortunately, it’s not hard to set up a Google Analytics account and begin tracking your most useful metrics right away. This includes traffic counts and sources, bounce rate, and much more. With that information in hand, you’ll be able to tweak your website to improve its User Experience (UX), engagement, and conversions.
In this article, we’ll briefly discuss why Google Analytics is such a widely-recommended tool. Then we’ll go over four steps that will get you connected and crunching numbers in no time. Let’s dive right in!
Whether you're running an e-shop, business website, or killer blog, our hosting plans make it easy to grow.Why Partner with DreamHost? Simple!

Getting to Know Google Analytics (And Why You Need It)
It’s hard to find information about tracking website data that doesn’t recommend using Google Analytics. There are a few reasons for its pervasiveness, beyond that fact that most of its features are free to use.

To start, Google is still the king of search, with 91.98% of the world’s search engine market share. Thanks to its success and experience in the field, Google has also managed to develop some of the best filters, bots, algorithms, and more. This means that the data you gather through Google Analytics will be more accurate than that gained through other tools.
Of course, if you’re not already tracking analytics, you may be wondering why you should be doing so. Web analytics is the science of gathering data from your website and synthesizing it into a format that tells you something of value. For example, your site’s traffic count tells you how many visitors come to your pages from day to day.
That kind of metric is useful on its own, but far more potent in combination with other data. Through collecting a wide range of analytics, you can put your traffic count into context with other relevant data points such as traffic sources, bounce rates, session lengths, and more.
All of this information can also provide you with:
- The insights you need to make data-driven decisions about your site.
- More accuracy when strategizing for target audiences.
- Understanding your audience’s behaviors and characteristics.
- Ideas for how to generate more traffic, engagement, and conversions.
Analytics can show you where your efforts are not making a valuable impact, as well as the areas where you are managing to generate leads and conversions. Over time this can save you money and resources, and ultimately boost your revenue.
Related: Need Analytics Reports? Check Out Our Recommended SEO Tools
How to Install Google Analytics on Your Website (In 4 Steps)
It’s easy to be intimidated by a tool like Google Analytics if you’re new to it. However, the following steps should help you build some confidence with this vital platform.
If you haven’t already, we recommend setting up both an Analytics account and a Google Tag Manager account first. Then you’re ready to start connecting these tools up to your site.
However, it’s necessary to note: When you get to the point in the Analytics setup process where you’re asked to add a snippet of code to your website, you should stop. You’re going to be using Tag Manager to do that part, as we’ll cover below.
Step 1: Use Google Tag Manager to Set Up Your Analytics Tag
There are several ways to set up Google Analytics with your website. For this tutorial, we’re going to use Tag Manager, another free and useful Google product.

One of the reasons this is a recommended method is because it enables you to configure specific tags for your website easily. Otherwise, you might require a developer to set up those tags for you, which can be expensive. Plus, manually installing tags can make it difficult to properly track and manage tags over time.
Tags are snippets of code that, when added to your website, enable data to be collected and sent to a third-party platform. In this case, they’ll be gathering metrics from your site and transferring them over to your Analytics dashboard.
While it might take a little time to get used to Tag Manager, you’ll soon be able to easily customize tags for tracking conversions and other vital data. When you log into your Tag Manager workspace, you’ll click on Add a new tag to get started.

Next, you’ll name your tag and click in the Tag Configuration area. This will bring up a list of tag types to choose from.

In this case, you’ll want to select Google Analytics: Universal Analytics. Then, you’ll need to choose New Variable from the Select Settings Variable drop-down menu.

You’ll also see that you can change the metric you want to track as well. We’ll come back to that in a minute, however.
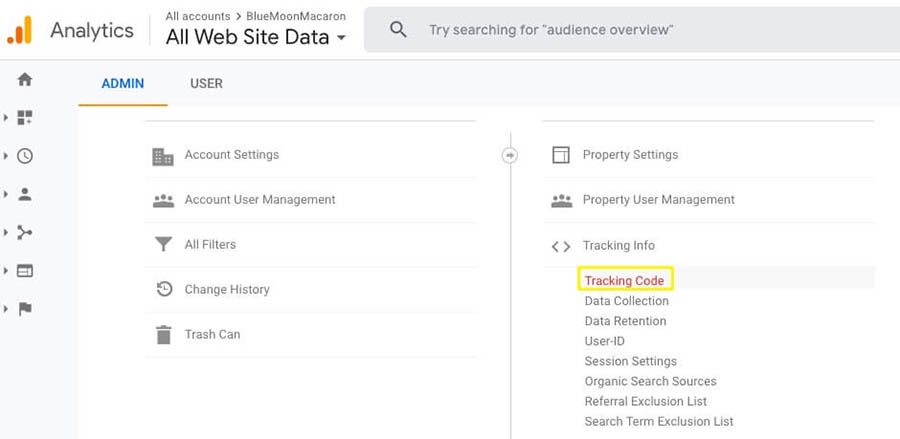
Now you’ll need to open up your Google Analytics account and copy your tracking code. To do that, go to your Analytics dashboard and navigate to Admin > Property > Tracking Info > Tracking Code.
Once you’ve copied your tracking code, you’ll need to go back to Tag Manager and paste it in the Tracking ID field for your Variable Configuration.

This effectively links your tags to your Analytics dashboard. However, there are still some settings to attend to.
This includes setting up what actions on your website will trigger the tracking tag. To do that, just click on Triggering underneath your Tag Configuration information. You’ll then have many potential actions to choose from.

Initially, you might want to establish a trigger for all pages or page views. You can always create more triggers and tags later on, so it’s a good idea to start with something basic.
Select your trigger, and then Save your choices. From your main workspace, you’ll then need to Submit and Publish your tag.

Next, you’re ready to add some code to your website, so Google can begin pulling data into your Analytics dashboard.
Step 2: Add the Tag Manager Code to Your Website
One of the easiest ways to add the Tag Manager tracking code to your WordPress website is to install the Insert Headers and Footers plugin first.

This tool will make it easy to paste in the code you’ll be provided with when you publish your tag. If you have to locate that code snippet later, you can find it under Admin > Container > Install Google Tag Manager.

Tag Manager will provide you with a snippet for both the header and the body of your website. You can use the plugin to paste in the code, or you can add it to your site’s files manually. The code needs to be placed within the <head> and <body> tags, respectively.
Related: Adding Google Analytics to WordPress? We’ve Got a Guide for That
Step 3: Establish Your Goals
Now that you know how to track data on your website, it’s important to think about which metrics you’d like to pay attention to. Fortunately, your Google Analytics dashboard provides an accessible way to set and manage your goals.
In Analytics’ terms, “goals” are a way for you to track particular user behaviors on your website. You can select specific actions, and data will be gathered based on how often a user completes that action.
You can add new goals by going to your Google Analytics dashboard and navigating to Admin > View > Goals > +New Goal.

There, you’ll have access to some goal templates. This is the easiest way to set up tracking, so you can get very specific, granular data about your website. For example, you can track exactly how your users move through every part of your marketing process or funnel, in order to see what’s working and what needs to be improved.
Related: Use Your Web Analytics Tools to Track These 20 Blog Metrics
Step 4: How to Integrate Google Analytics Using a WordPress Plugin
Gathering information in your Analytics dashboard is useful, but it also means you have to leave your website to view its metrics. The good news is that you can also see much of that data right in your WordPress admin panel, as long as you use the right analytics plugin.
MonsterInsights is one of the leading plugins available for integrating Google Analytics data right into your WordPress dashboard. It’s easy to set up and provides most of the basic reports you’ll need.

Keep in mind that MonsterInsights is also an alternative to using Tag Manager for installing Analytics on your website. You can paste in your Google Analytics tracking ID, and the plugin will take care of the rest of the process for you. However, if you want access to some of the more advanced analytics possible with Google, you’ll likely need the premium version of the plugin.
Google Site Kit is another option for integrating all of your analytics data with your WordPress dashboard.

One of the benefits of setting up your data monitoring this way is that you’ll also be able to track metrics at the page level, as Site Kit displays that data on each page you view when you’re logged in as an admin.

Another advantage of Site Kit is that it’s a part of the Google family. That makes it easy to bring in data from other Google tools, including:
It can take some time to work through the setup for each of these accounts, but the user interface for the free plugin is very well thought-out and comprehensive. You can use a simple wizard to set up each integration.
After about 24 hours, your analytics data will populate into your WordPress dashboard. This is an excellent way to link up your Analytics account to the other tools you’re using, getting a more complete picture of what’s happening on your site.
Related: How Analytics Tracking Can Solve Your Five Biggest Worries About Your Site
Leverage Your Analytics Tracking Across Teams With Shared Settings
Now that you’ve got plenty of data to sort through, you’ll likely begin to see how other parts of your team can benefit from viewing certain reports. Fortunately, you can share Analytics dashboards with other users.
Additionally, you can use Google Ads tools to set up custom views in your dashboard. This means you can tailor reports to meet the needs of different parts of your team. For example, by using Tag Manager, you can track user experiences on your site. This data might be useful for both your marketing and your web design teams.
Whatever your specific needs might be, it’s vital to make sure everyone on your team has access to the data they need. Having timely, accurate information can keep everyone on the same page and result in better decision-making.
Whether you need help picking performance indicators, installing Google Analytics, or creating a social media strategy, we can help! Subscribe to our monthly digest so you never miss an article.Insights in Your Inbox

Add Google Analytics to Your Site
Google Analytics can be a massive help to your marketing efforts. It enables you to get a clear picture of how your site is being used, and hone in on its most and least effective elements. For example, understanding what the top source of your web traffic is can inform how you allocate marketing resources.
Just keep in mind these four steps to get started once you set up your Tag Manager and Google Analytics account, including:
- Deploy Analytics using Tag Manager.
- Add the Tag Manager code to your website.
- Create goals in Analytics to collect specific metrics.
- Use plugins to integrate Analytics with WordPress.
Here at DreamHost, we offer shared WordPress hosting plans that are ready to grow with you as you put your new analytics account to work!
